23 블로그 리스트 데이터 받아오기 (useEffect)
db에 있는 데이터를 받아와서 ListPage에 보여주는 것을 해보겠다 !
db랑 통신할 때 BlogForm.js를 보면 axios를 사용했었음 - 그 때는 post request를 사용했는데,
지금은 데이터를 가져오는 것이기 때문에 get request를 사용하겠다.


이제 받아온 data를 state 안에 넣어볼게요
state를 사용해야지 state가 변경되면서 화면이 re rendering 되고 화면에 뜨게 된다.
import axios from 'axios';
import { useState } from 'react';

const ListPage = () => {
    const [posts, setPosts] = useState([]);

    const getPosts = () => {  // 데이터를 받아오는 역할을 하는 함수
        axios.get('http://localhost:3001/posts').then((response) => { //받아온 요청을 사용하고 싶으면 then을 붙여야함
                setPosts(response.data); // state 안에다가 받아온 data를 넣어준다.
            }
        )
    }

    getPosts();

    return (
        <div>List Page</div>
    );
};

export default ListPage;
이때 getPosts() 함수가 실행이 되면서 응답을 받아오게 되고 state가 업데이트 되면서 ListPage 함수가 다시 한번 실행이 되면서 re rendering -> 또 getPosts() ..무한
-> 그래서 사용할 수 있는 게 React Hooks에서 useEffect
import axios from 'axios';
import { useState, useEffect } from 'react';

const ListPage = () => {
    const [posts, setPosts] = useState([]);

    const getPosts = () => {
        axios.get('http://localhost:3001/posts').then((response) => {
                setPosts(response.data);
            }
        )
    }

    useEffect(() => {
        getPosts();
    }, []) //뒤에 빈 배열을 넣어주면 함수 컴포넌트 한번만 실행. 즉 업데이트 돼도 다시 실행되지 않음.


    return (
        <div>List Page</div>
    );
};

export default ListPage;
24 받아온 데이터 화면에 출력하기
import axios from 'axios';
import { useState, useEffect } from 'react';

const ListPage = () => {
    const [posts, setPosts] = useState([]);

    const getPosts = () => {
        axios.get('http://localhost:3001/posts').then((response) => {
                setPosts(response.data);
            }
        )
    }

    useEffect(() => {
        getPosts();
    }, [])

    return (
        <div>
            <h1>Blogs</h1>
            {posts.map(post => {
                return (
                    <div>{post.title}</div>
                );
            })}
        </div>
    );
};

export default ListPage;

근데 이제 console을 열어보면 error.. -> unique한 key를 넣어줘야함
import axios from 'axios';
import { useState, useEffect } from 'react';

const ListPage = () => {
    const [posts, setPosts] = useState([]);

    const getPosts = () => {
        axios.get('http://localhost:3001/posts').then((response) => {
                setPosts(response.data);
            }
        )
    }

    useEffect(() => {
        getPosts();
    }, [])

    return (
        <div>
            <h1>Blogs</h1>
            {posts.map(post => {
                return (
                    <div key={post.id}>{post.title}</div>
                );
            })}
        </div>
    );
};

export default ListPage;
25 Card 컴포넌트 만들기 (props)
import axios from 'axios';
import { useState, useEffect } from 'react';

const ListPage = () => {
    const [posts, setPosts] = useState([]);

    const getPosts = () => {
        axios.get('http://localhost:3001/posts').then((response) => {
                setPosts(response.data);
            }
        )
    }

    useEffect(() => {
        getPosts();
    }, [])

    return (
        <div>
            <h1>Blogs</h1>
            {posts.map(post => {
                return (
                    <div className="card mb-3" key={post.id}> {/*key를 젤 위의 element에 붙이는 이유?*/}
                        <div className="card-body">
                            {post.title}
                        </div>
                    </div>
                );
            })}
        </div>
    );
};

export default ListPage;
반복되는 부분 Card 컴포넌트 생성

** ListPage.js에서 -> 자식 컴포넌트 (Card.js)에 data를 넘겨주는 데 사용할 수 있는 것이 props (properties의 줄임말)
(title이라는 원하는 이름으로 넘겨줄 수 있다.)
ListPage.js
import axios from 'axios';
import { useState, useEffect } from 'react';
import Card from '../components/Card';

const ListPage = () => {
    const [posts, setPosts] = useState([]);

    const getPosts = () => {
        axios.get('http://localhost:3001/posts').then((response) => {
                setPosts(response.data);
            }
        )
    }

    useEffect(() => {
        getPosts();
    }, [])

    return (
        <div>
            <h1>Blogs</h1>
            {posts.map(post => {
                return (
                    <Card key={post.id} title={post.title} /> //map을 사용할땐 key를 써줘야함
                );
            })}
        </div>
    );
};

export default ListPage;
Card.js
const Card = (props) => {
    return (
        <div className="card mb-3">
            <div className="card-body">
                {props.title}
            </div>
        </div>
    );
};

export default Card;
+) 여러 개가 올 때 구조분해
const Card = ( { title, description }) => { //객체를 하나 만들어서서
    return (
        <div className="card mb-3">
            <div className="card-body">
                {title}{description}
            </div>
        </div>
    );
};

export default Card;
26 props children
title이 아니라 다른 contents도 있을 수 있잖아요? 전체 contents를 다루는 게 children을 보내는 방법.
ListPage.js
return (
        <div>
            <h1>Blogs</h1>
            {posts.map(post => {
                return (
                    <Card key={post.id} title={post.title}>
                        <div className="d-flex justify-content-between">
                            <div>{post.title}</div>
                            <div>buttons</div>
                        </div> {/* 이 전부가 children */}
                    </Card>
                );
            })}
        </div>
    );
Card.js
const Card = ( { title, children } ) => {
    return (
        <div className="card mb-3">
            <div className="card-body">
                {children}
            </div>
        </div>
    );
};

export default Card;

ListPage.js
import axios from 'axios';
import { useState, useEffect } from 'react';
import Card from '../components/Card';

const ListPage = () => {
    const [posts, setPosts] = useState([]);

    const getPosts = () => {
        axios.get('http://localhost:3001/posts').then((response) => {
                setPosts(response.data);
            }
        )
    }

    useEffect(() => {
        getPosts();
    }, [])

    return (
        <div>
            <h1>Blogs</h1>
            {posts.map(post => {
                return (
                    <Card key={post.id} title={post.title}>
                        <button>button</button>
                    </Card>
                );
            })}
        </div>
    );
};

export default ListPage;
Card.js
const Card = ( { title, children } ) => {
    return (
        <div className="card mb-3">
            <div className="card-body">
                <div className="d-flex justify-content-between">
                    <div>{title}</div>  {/*왼쪽에는 항상 title이 있고*/}
                    {children && <div>{children}</div>}  {/*children이 있을 경우(true)에는*/}
                </div>
            </div>
        </div>
    );
};

export default Card;

27 Prop types
props의 type을 지정하는 방법
패키지 설치
npm i prop-types
Card.js
import PropTypes from 'prop-types';

const Card = ( { title, children } ) => {
    return (
        <div className="card mb-3">
            <div className="card-body">
                <div className="d-flex justify-content-between">
                    <div>{title}</div>
                    {children && <div>{children}</div>}
                </div>
            </div>
        </div>
    );
};

Card.propTypes =    {
    title: PropTypes.string,
};

Card.defaultProps = {  // 기본 값 설정 (ListPage.js에서 아무것도 보내주지 않으면 이 기본 값을 title 자리에 넣어주게 됨.)
    title: 'Title'
};

export default Card;
=> ListPage.js에서
title={post.title}로 사용
근데 이제 Card 컴포넌트에서 기본값을 설정해주고 싶지 않고, title props를 항상 필수로 해주고 싶다면?
isRequired를 붙여주면 됨
Card.js
import PropTypes from 'prop-types';

const Card = ( { title, children } ) => {
    return (
        <div className="card mb-3">
            <div className="card-body">
                <div className="d-flex justify-content-between">
                    <div>{title}</div>
                    {children && <div>{children}</div>}
                </div>
            </div>
        </div>
    );
};

Card.propTypes =    {
    title: PropTypes.string.isRequired,
    children: PropTypes.element,
};

Card.defaultProps = {
    children: null,
};

export default Card;
-> 아래처럼 쓰면 console에 에러남. type이 맞지 않아서

근데 아래처럼 쓰는 건 괜찮다.

28 생성 버튼
생성 페이지로 이동하는 버튼을 만들어 보자
ListPage.js
            <div className="d-flex justify-content-between">
                <h1>Blogs</h1>
                <div>
                    <Link to="/blogs/create" className="btn btn-success">
                        Create New
                    </Link>
                </div>
            </div>

29 수정 페이지로 이동 (history.push)
카드(게시물)을 누르면 수정하는 페이지로 이동하는 기능
ListPage.js
import axios from 'axios';
import { useState, useEffect } from 'react';
import Card from '../components/Card';
import { Link } from 'react-router-dom';
import { useHistory } from 'react-router';

const ListPage = () => {
    const history = useHistory();
    const [posts, setPosts] = useState([]);

    const getPosts = () => {
        axios.get('http://localhost:3001/posts').then((response) => {
                setPosts(response.data);
            }
        )
    }

    useEffect(() => {
        getPosts();
    }, [])

    return (
        <div>
            <div className="d-flex justify-content-between">
                <h1>Blogs</h1>
                <div>
                    <Link to="/blogs/create" className="btn btn-success">
                        Create New
                    </Link>
                </div>
            </div>
            {posts.map(post => {
                return (
                    <Card
                        key={post.id}
                        title={post.title}
                        onClick={() => history.push('/blogs/edit')}
                    />
                );
            })}
        </div>
    );
};

export default ListPage;
(컴포넌트 위에서 그냥 바로 onClick은 안됨)
Card.js
import PropTypes from 'prop-types';

const Card = ( { title, onClick, children } ) => {
    return (
        <div
            className="card mb-3 cursor-pointer"
            onClick={onClick} //함수로 받아온 Props를 넣어주자
        >
            <div className="card-body">
                <div className="d-flex justify-content-between">
                    <div>{title}</div>
                    {children && <div>{children}</div>}
                </div>
            </div>
        </div>
    );
};

Card.propTypes =    {
    title: PropTypes.string.isRequired,
    children: PropTypes.element,
    onClick: PropTypes.func, //추가
};

Card.defaultProps = {
    children: null,
    onClick: () => {}, //필수가 아니라서
};

export default Card;
index.css
.cursor-pointer {
  cursor: pointer;
}
30 이벤트 버블링
한 요소에 이벤트가 발생하면 이 요소에 할당된 핸들러가 동작하고, 이어서 부모 요소의 핸들러가 동작하고, 최상단의 부모 요소를 만날 때까지...
이벤트 버블링을 막는 방법
ListPage.js
                    <Card
                        key={post.id}
                        title={post.title}
                        onClick={() => history.push('/blogs/edit')}
                    >
                        <div>
                            <button
                                className="btn btn-danger btn-sm"
                                onClick={(e) => {
                                    e.stopPropagation();
                                    console.log('delete blog')
                                }}
                            >
                                Delete
                            </button>
                        </div>
                    </Card>
(Optional) 자바스크립트 filter 함수
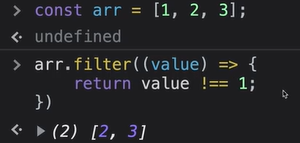
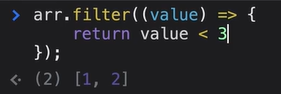
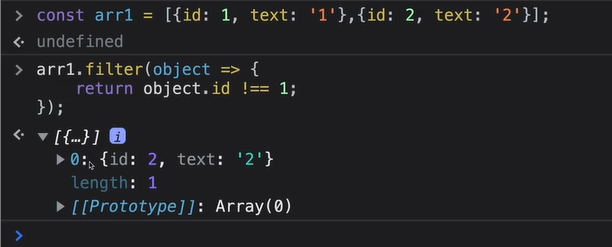
31 블로그 삭제하기
ListPage.js
import axios from 'axios';
import { useState, useEffect } from 'react';
import Card from '../components/Card';
import { Link } from 'react-router-dom';
import { useHistory } from 'react-router';
const ListPage = () => {
const history = useHistory();
const [posts, setPosts] = useState([]);
const getPosts = () => {
axios.get('http://localhost:3001/posts').then((response) => {
setPosts(response.data);
})
}
const deleteBlog = (e, id) => {
e.stopPropagation();
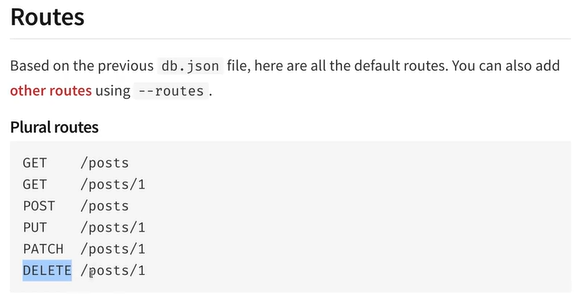
axios.delete(`http://localhost:3001/posts/${id}`).then(() => {
setPosts(prevPosts => {
return prevPosts.filter(post => {
return post.id !== id;
})
});
}); // 백태그
};
useEffect(() => {
getPosts();
}, [])
return (
<div>
<div className="d-flex justify-content-between">
<h1>Blogs</h1>
<div>
<Link to="/blogs/create" className="btn btn-success">
Create New
</Link>
</div>
</div>
{posts.map(post => {
return (
<Card
key={post.id}
title={post.title}
onClick={() => history.push('/blogs/edit')}
>
<div>
<button
className="btn btn-danger btn-sm"
onClick={ (e) => deleteBlog(e, post.id)}
>
Delete
</button>
</div>
</Card>
);
})}
</div>
);
};
export default ListPage;
더 간단하게
    const deleteBlog = (e, id) => {
        e.stopPropagation();
        axios.delete(`http://localhost:3001/posts/${id}`).then(() => {
            setPosts(prevPosts => prevPosts.filter(post => post.id !== id))
        }); // 백태그
    };
32 블로그 포스트가 없을 경우
blog post가 db에 존재하지 않으면 user한테 알려주는 텍스트
            {posts.length > 0 ? posts.map(post => {
                return (
                    <Card
                        key={post.id}
                        title={post.title}
                        onClick={() => history.push('/blogs/edit')}
                    >
                        <div>
                            <button
                                className="btn btn-danger btn-sm"
                                onClick={ (e) => deleteBlog(e, post.id)}
                            >
                                Delete
                            </button>
                        </div>
                    </Card>
                );
            }) : 'No blog posts found'}
33 Loading Spinner
bootstrap -> spinners
ListPage.js
{loading ? (
                <div className="d-flex justify-content-center">
                    <div className="spinner-border" role="status">
                        <span className="visually-hidden">Loading...</span>
                    </div>
                </div>
            )   : posts.length > 0 ? posts.map(post => {
                return (
                    <Card
                        key={post.id}
                        title={post.title}
                        onClick={() => history.push('/blogs/edit')}
                    >
                        <div>
                            <button
                                className="btn btn-danger btn-sm"
                                onClick={ (e) => deleteBlog(e, post.id)}
                            >
                                Delete
                            </button>
                        </div>
                    </Card>
                );
            }) : 'No blog posts found'}
이랬는데
import axios from 'axios';
import { useState, useEffect } from 'react';
import Card from '../components/Card';
import { Link } from 'react-router-dom';
import { useHistory } from 'react-router';

const ListPage = () => {
    const history = useHistory();
    const [posts, setPosts] = useState([]);
    const [loading, setLoading] = useState(true); //초기값 true

    const getPosts = () => {
        axios.get('http://localhost:3001/posts').then((response) => {
            setPosts(response.data);
            setLoading(false); //업데이트가 되면(응답이 오면은) spinner가 사라짐
        })
    }

    const deleteBlog = (e, id) => {
        e.stopPropagation();
        axios.delete(`http://localhost:3001/posts/${id}`).then(() => {
            setPosts(prevPosts => prevPosts.filter(post => post.id !== id))
        });
    };

    useEffect(() => {
        getPosts();
    }, []);

    const renderBlogList = () => {
        if (loading) {
            return (
            <div className="d-flex justify-content-center">
                <div className="spinner-border" role="status">
                    <span className="visually-hidden">Loading...</span>
                </div>
            </div>
            );
        }

        if (posts.length === 0) {
            return (<div>No blog posts found</div>);
        }

        return posts.map(post => {
            return (
                <Card
                    key={post.id}
                    title={post.title}
                    onClick={() => history.push('/blogs/edit')}
                >
                    <div>
                        <button
                            className="btn btn-danger btn-sm"
                            onClick={ (e) => deleteBlog(e, post.id)}
                        >
                            Delete
                        </button>
                    </div>
                </Card>
            );
        })
    };

    return (
        <div>
            <div className="d-flex justify-content-between">
                <h1>Blogs</h1>
                <div>
                    <Link to="/blogs/create" className="btn btn-success">
                        Create New
                    </Link>
                </div>
            </div>
            {renderBlogList()}
        </div>
    );
};

export default ListPage;
요래 대씀당
그리고 loading spinner는 많이 쓸 거기 때문에 component로 빼내기
LoadingSpinner.js
const LoadingSpinner = () => {
    return (
        <div className="d-flex justify-content-center">
            <div className="spinner-border" role="status">
                <span className="visually-hidden">Loading...</span>
            </div>
        </div>
    );
}

export default LoadingSpinner;
ListPage.js
import axios from 'axios';
import { useState, useEffect } from 'react';
import Card from '../components/Card';
import { Link } from 'react-router-dom';
import { useHistory } from 'react-router';
import LoadingSpinner from '../components/LoadingSpinner';

const ListPage = () => {
    const history = useHistory();
    const [posts, setPosts] = useState([]);
    const [loading, setLoading] = useState(true); //초기값 true

    const getPosts = () => {
        axios.get('http://localhost:3001/posts').then((response) => {
            setPosts(response.data);
            setLoading(false); //업데이트가 되면(응답이 오면은) spinner가 사라짐
        })
    }

    const deleteBlog = (e, id) => {
        e.stopPropagation();
        axios.delete(`http://localhost:3001/posts/${id}`).then(() => {
            setPosts(prevPosts => prevPosts.filter(post => post.id !== id))
        });
    };

    useEffect(() => {
        getPosts();
    }, []);

    const renderBlogList = () => {
        if (loading) {
            return (
                <LoadingSpinner />
            );
        }

        if (posts.length === 0) {
            return (<div>No blog posts found</div>);
        }

        return posts.map(post => {
            return (
                <Card
                    key={post.id}
                    title={post.title}
                    onClick={() => history.push('/blogs/edit')}
                >
                    <div>
                        <button
                            className="btn btn-danger btn-sm"
                            onClick={ (e) => deleteBlog(e, post.id)}
                        >
                            Delete
                        </button>
                    </div>
                </Card>
            );
        })
    };

    return (
        <div>
            <div className="d-flex justify-content-between">
                <h1>Blogs</h1>
                <div>
                    <Link to="/blogs/create" className="btn btn-success">
                        Create New
                    </Link>
                </div>
            </div>
            {renderBlogList()}
        </div>
    );
};

export default ListPage;
34 생성 후 리스트 페이지로 이동
post 버튼 누르면 리스트 페이지로 이동
history.push를 이동해서 페이지 이동한 것과 같은 원리
BlogForm.js
import { useState } from 'react';
import axios from 'axios';
import { useHistory } from 'react-router';

const BlogForm = () => {
    const history = useHistory();

    const [title, setTitle] = useState('');
    const [body, setBody] = useState('');
    const onSubmit = () => {
        axios.post('http://localhost:3001/posts', {
            title: title,
            body: body
        }).then(() => {
            history.push('/blogs');
        })
    };

    return (
        <div>
            <h1>Create a blog post</h1>
            <div className="mb-3">
            <label className="form-label">Title</label>
            <input
                className="form-control"
                value={title}
                onChange={ (e) => {
                setTitle(e.target.value);
                } }
            />
        </div>

        <div className="mb-3">
            <label class Name="form-label">Body</label>
            <textarea
                className="form-control"
                value={body}
                onChange={ (e) => {
                setBody(e.target.value);
                } }
            />
        </div>

        <button
            className="btn btn-primary"
            onClick={onSubmit}
        >
        Post
        </button>

        </div>
    );
};

export default BlogForm;
onSubmit 누르면 then 실행
'Frontend > 프로젝트로 배우는 React.js' 카테고리의 다른 글
| 섹션 5. 블로그 디테일 페이지 (1) | 2023.11.29 |
|---|---|
| Axios Error: Network Error (0) | 2023.11.29 |
| 섹션 3. React Router로 페이지 추가하기 (0) | 2023.11.06 |
| 섹션 2 (0) | 2023.11.03 |
| 섹션 0, 섹션 1 (0) | 2023.11.02 |


